Hope you enjoyed the previous series on VMware vCloud Director networking. In this post I will show you how to make the vCloud Cells available through a Load Balancer using the vShield Edge. By publishing two or more vCloud Cells behind a load balancer, it is easier to separate management network from user network and you make the vCloud more redundant because you can shutdown a cell without bringing down the whole vCloud. Do keep in mind that a user session will get disconnected when you shutdown a cell, but the user can immediately reconnect and will be redirected.
Design
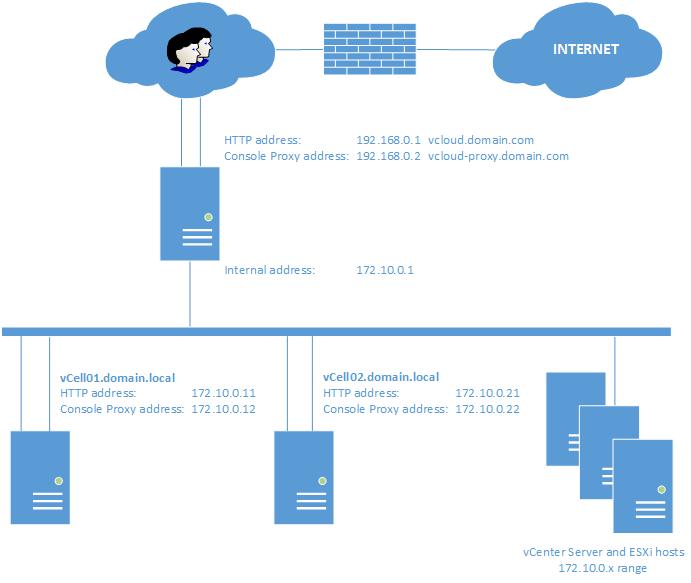
To better understand the configuration we need a design. Below you’ll see the design in which the ESXi hosts and the vCenter Server are in the management network (172.10.0.x range). The user network is in the 192.168.0.x range and all traffic goes over the user network to the internet. The real situation this design is based upon is a little different, since the management network is routed to the internet over another network, but that would only complicate the example.
Preparing the vCloud cells
Before we start configuring the load balancer, something have to be prepared on the vCloud cells.
- The first step is to make sure the certificates are the SAME on both cells. If you generated a self-signed certificate on each cell during install, you will have to change this.
- The second step is to make sure that the vCloud cells are properly syncing time.
I have been fighting an issue where the console proxy session (VMware Remote Console) would disconnect when two vCloud cells where behind the load balancer. If only one vCloud cells was running, then everything worked fine. Starting the second vCloud cell behind the load balancer would work well for the HTTP sessions, but the VMRC (VMware Remote Console) session would always disconnect. Didn’t matter which vCloud cell I would shut down, as long as just one was running the VMRC would work fine. This turned out to be an issue with the cells running a 2min time difference.
Installing same certificate on both vCloud cells
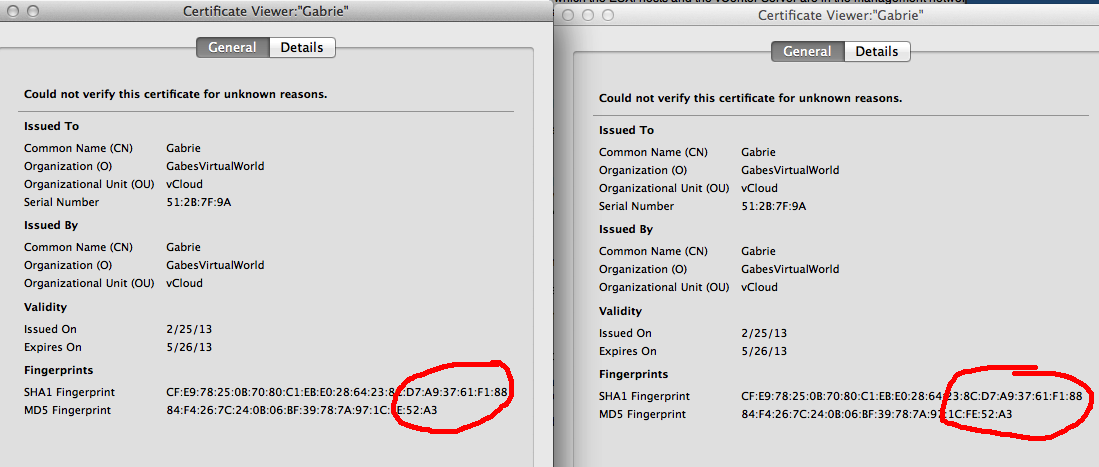
During installation of the vCloud cells you had to generate a certificate. In my case I put my certificates in a file named /etc/certificates.ks. Assuming the certificate on vCloud cell is ok, we’re now going to copy the certificate to the second vCloud cell. Let’s first check the certificates currently on both the vCloud cells. Open a browser and go to both the vCloud cells websites. You’ll see the security certificate icon telling you that this website uses a certificate. In my case I’m using firefox and when opening the certificate information, I see the following. Notice how the thumbprints are different.

- Logon through SSH on the first vCloud cell, make sure you are root or if you want to do it really safe use sudo
- Copy the certificates from this vCloud cell to a location where you can access it from the second vCloud cell. In my case I copy it to the data transfer directory. I have a special directory created there that holds the installation bin files of vCloud Director, the responses file and the certificates. Copy:
-
cp /etc/certificates.ks /opt/vmware/vcloud-director/data/transfer/install/
- Make sure you have the responses file from the first installation in a location that you can access from the second vCloud cell, but actually I would have expected that you already have this since you already installed a second cell. Just to be sure:
-
cp /opt/vmware/vcloud-director/etc/responses.properties /opt/vmware/vcloud-director/data/transfer/install/
- Logon to the second vCloud cell and switch to root (leave the session on the first open because we’ll return here later on for the time sync)
- Stop the vCloud services on the second vCloud cell:
-
service vmware-vcd stop
- Copy the certificates file from the first vCloud cell to the location of the certificates file of the second vCloud cell. In my case that is /etc/certificates.ks. Copy:
-
cp /opt/vmware/vcloud-director/data/transfer/install/certificates.ks /etc/certificates.ks (yes to overwrite).
- To active the certificate, you need to rerun the configuration of vCloud Director. By using the responses file, you don’t have to answer all the database questions. In my case I need to run this to reconfigure:
-
/opt/vmware/vcloud-director/bin/configure -r /opt/vmware/vcloud-director/data/transfer/install/responses.properties
- After configuration is complete answer YES to have the configuration script start the vCloud service or start it yourself using:
-
service vmware-vcd start
- Monitor the startup of the vCloud cell and wait for “Complete. Server is ready”. Monitor:
-
tail -f /opt/vmware/vcloud-director/logs/cell.log
Let’s check if the certificates on the second vCloud cell indeed has changed by browsing to the second vCloud cell. Open the information of the certificate in your browser and see how the thumbprints match. Fase1 completed.
Time sync of the vCloud cells
It seems that having a time drift between the two vCloud cells of more than 2 minutes will cause disconnects of the console proxy session. Since the ntpd is NOT running in a standard RedHat install, we need to make sure it is, it will at start up and that the time is synced. The ntpd depends on the /etc/ntp.conf file which is already configured correctly by default if your vCloud cell is allowed to connect to the internet. In the next steps we’re going to start ntp, make sure it will run at startup and force a time sync:
-
service ntpd start
-
chkconfig --level 345 ntpd on
-
ntpdate -u clock.redhat.com
- watch date
Run the above on both cells and to see if time is in sync, it will run the date command and refresh every 2sec. Stop by hitting ctrl+c. Fase 2 completed. Now we can finally start with configuring the load balancer.
vShield Edge Load Balancer
To create the vShield Edge Load Balancer, we need to go to the vShield Manager. Logon to the vShield Manager and go on the lefthand side to the datacenters section and select your datacenter, not the cluster. On the righthand side click “Network virtualisation” and “Edges”.

Before we start configuring the vShield Edge Load Balancer, make sure you have all the IPs noted down that you need. The vShield Edge Load Balancer will get two IP addresses in the user network, one for HTTP, one for ConsoleProxy. On the management network only one IP is needed which can connect to the vCloud cells.
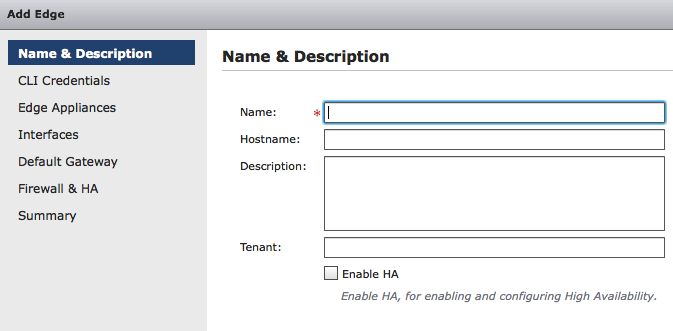
Now press the plus sign to create a new Edge device. The wizard will pop up and will ask for the name of the Edge device. For the name I entered: “vCloud-LoadBalance“. The hostname is “vcloud.domain.com“, this is the outside FQDN. You can leave the tenant field empty and I didn’t enable HA. Press next and you’ll be asked to enter the credentials for this edge device. If you want to use the same credentials you use for the vShield Manager, just leave it like it is. Click next. In this screen you can select the Appliance size, choose Compact and you can specify where the appliance should be place. Click on the little plus to configure placement. Select the Cluster/Resource pool and the datastore. I choose the “System vDC” resource pool because I feel that it belongs there. If you have better suggestions let me know. Click SAVE and then next.
In this next step we will be configuring the interfaces of the Edge device. Click the plus sign to add a new interface.
The first interface will be the external interface. On this interface we will connect two IP addresses, the HTTP (192.168.0.1) and ConsoleProxy address (192.168.0.2). Click the plus sign to add a new interface. Name it: “external“, select the PortGroup you want it to connect to. Make sure the connectivity status is “connected” and then click the plus sign to add IP addresses. Enter the IP addresses and the subnet mask. In our case: 192.168.0.1 (primary) and 192.168.0.2. Subnet mask 255.255.255.0. Save the IP settings and you will return to the first wizard. Leave Mac addresses empty, adjust MTU if needed, leave Enable Proxy ARP and Send ICMP Redirect empty. Click ADD. Now add the second interface which will be connected to the internal address 172.10.0.1 in the same way you did for the external interface.
Click Next in the wizard and you will get the “Default Gateway” screen. Enable “Configure default gateway”, select the external nic and enter the correct gateway address. In my case that would be 192.168.0.254. Change the MTU if needed. Again click Next.
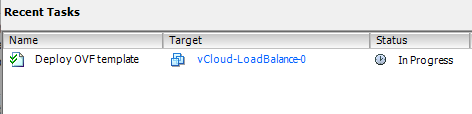
Now the firewall & HA screen will ask to enable the firewall. Since this is a device that could be connected to the big bad world, enable the firewall policy and set the default to “Deny”. Click next to continue and finish to close the wizard. When you look at your vCenter Server you should be able to see the deployment of an OVF file.
When done you should see the following in the vShield Manager.

The next step is to configure the real load balancing. First we need a “Pool” of servers that offer the same functionality. In our case the Pool of servers will hold all vCloud cells. Second we then need a virtual server. The virtual server is what is published to the outside world.
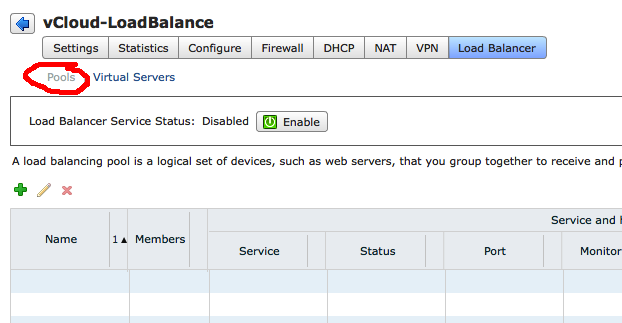
Click the “vCloud-LoadBalance” we’ve just created and click “Actions” -> “Manage”. Here you’ll see an overview of the configured settings. Click “Load Balancer” and be sure that “Pools” is selected. Click the plus sign to start the “Add Pool” wizard. The name will be “vCloud_HTTP” (no spaces allowed). Next we configure the services. Enable HTTP and HTTPS and choose the balancing method “Least connections“. Leave the ports unchanged at 80 and 443.Click next. Now the Health Check screen appears. Only select HTTP (although I think HTTPS should work too) and for the URI for HTTP Service use: “/cloud/server_status“. Be sure to start with a forwardslash. Click Next.
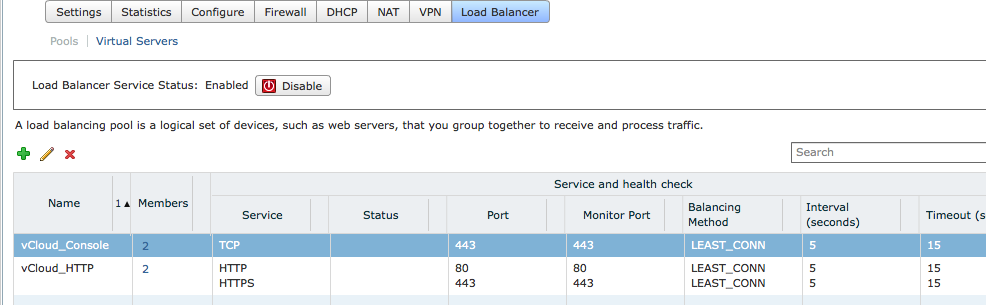
Now we need to enter each member of the pool. Be aware that we are only defining the HTTP part of the vCloud cell, so we add only the HTTP addresses of the vCloud cells for this pool. In our case add two IP addresses: 172.10.0.11 and 172.10.0.21. Add them both with a weight of 1. Leave the defaults of HTTP and HTTPS.
Next we’ll add the Console Proxy servers to the pool. Run the same wizard again and name it “vCloud_Console“. In the Services screen you have to pay a little attention, you only need TCP over port 443, not HTTPS !!! This is because the console proxy traffic travels over port 443 but it is no HTTPS traffic. In other words, on the services screen select TCP and change the port to 443 and select the “Least Connections” balancing method. In the Health Check screen select TCP and monitor port 443, leave the URI for HTTP Service empty. In the next screen we again need to add some IP addresses. Enter the IP addresses of the console proxy of the vCloud Cells ( 172.10.0.12 / 172.10.0.22). You now return to the vShield Manager screen. A little above the list of pools you see the “ENABLE” button, click this to enable the pool and push the “Publish Changes” button.
We now have a pool of servers defined that can accept the traffic from the load balancer. Now we need to define the services that the load balancer will allow from the outside.
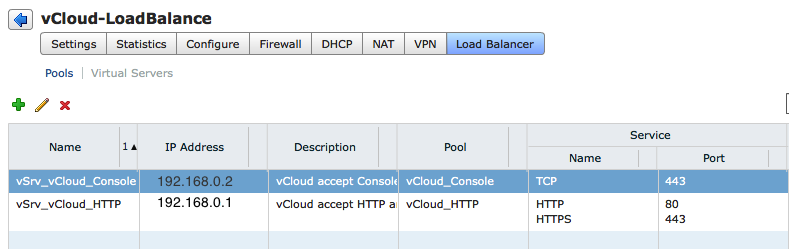
Click “Virtual Servers” and then the plug sign to start the “Add Virtual Server” wizard. You are now prompted to enter a name for this virtual server, use “vSrv_vCloud_HTTP“. Now enter the IP address of the outside HTTP interface 192.168.0.1. Select the pool “vCloud_HTTP” and enable HTTP and HTTPS. Leave the defaults of persistence method cookie for HTTP and SSL_SESSION_ID for HTTPS. Click Add.
Again click plus to add a new virtual server. Name this server “vSrv_vCloud_Console“. Now enter the IP address of the outside HTTP interface 192.168.0.2. Select the pool “vCloud_Console” and enable TCP and change the port to 443. Click Add. Click Publish Changes.
That’s it. Your vCloud Edge Load Balancer is ready.
More posts on vCloud Director Networking can be found here:
- VMware vCloud 5.1 Networking for dummies part 1 – External access for a vCloud VM
- VMware vCloud 5.1 Networking for dummies part 2 – Connecting to vApp networks and giving external access
- VMware vCloud 5.1 Networking for dummies part 3 – Publish a vCloud deployed VM to the outside world
I know this is old but I have a few questions:
– If i’m using a CA server, can I still use the same certificate.ks for both cells even though the cell hostnames are different?
– Do the certs have to match the public URL the i enter into vCD > System > Adminstration > Public Address?
Thanks
Yes and yes
Time discrepancy between two cell’s was my issue with VMRC :) on CentOS “yum install ntp” and “service ntpd start” solved it…thank you!!