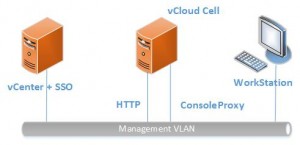
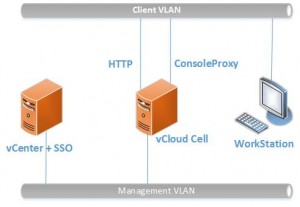
For an existing environment I had to change the VLAN and IP address that was used on the VMware vCloud 5.1 Cell. In VMware KB 1028657 is written how to change the IP address in the database and in the vCloud Cell config, but there is no mention of how to do this at Linux level. This post will show you the whole process.
The starting config in my case was like this:
- HTTP nic connected to Management LAN
- Console Proxy nic connected to Management LAN
- vCenter / SSO server in Management LAN
In the new situation:
- HTTP nic connected to Client VLAN
- Console Proxy nic connected to Client VLAN
- Third nic would be connect to Management VLAN
- Client VLAN cannot reach Management VLAN
- vCenter / SSO server in Management VLAN
SSO gotcha!
Before we start there is a little thing to be aware off. vCenter SSO is NOT suited to authenticate ‘normal’ vCloud Users. When I installed vCloud I saw a nice little checkbox that said “vCloud integration with vCenter SSO” and I checked it, because that is of course what I want. Wrong, you don’t want this, because now every user will be authenticated against SSO and, this is the real problem, there then needs to be a direct connection from the client device to the SSO server and this is probably not desirable. You’ll see the browser trying to logon to vCloud and reporting it can’t find server xyz, which is your SSO server and you just locked yourself out of your vCloud.
Logon to your vCloud Cell as admin, go to “Administration” and select “Federation” and at “Identity Provider”, do NOT select “Use vSphere Single Sign-On”.
Adding Nic and changing IP address
I’m using RedHat linux as platform for the vCloud Cell with VMware Tools installed. In my configuration the first nic remained unchanged (eth0). The second nic (eth1) would be switched to the new VLAN and a third nic would be added to the new VLAN.
- Make a snapshot of the vCloud Cell you’re working on.
- Change the VLAN of the 2nd Nic to the required VLAN. Note the Mac-address of the nic.
- On the RedHat console switch to root: su – (ok ok it is not the recommended safest way, but it makes it all a bit easier)
- Stop the vCloud Cell using: service vmware-vcd stop
- Now that the vCloud Cell is stopped, change the second nice (eth1) to reflect the new IP configuration. To make sure you are using the correct nic run: ifconfig and check the mac address and if this really is eth1 (in my case)
- Edit the IP configuration script: vi /etc/sysconfig/network-scripts/ifcfg-eth1
Note: to Save changes in the vi editor press: :wq (don’t forget the : ). To cancel without saving changes use: :q!
My configuration looked like this AFTER editing:
DEVICE=eth1
BOOTPROTO=static
BROADCAST=172.17.1.255
IPADDR=172.17.1.34
NETMASK=255.255.255.0
NETWORK=172.17.1.0
ONBOOT=yes
- Restart you network configuration: service network restart
- Check if the desired new IP address works: ifconfig
- At VM level add a third nic and select the new VLAN
- When VMware Tools are installed, you should see the new nic using after a few minutes, if not reboot the VM and don’t forget to again stop the Cloud Cell. To check for the new nic use: ifconfig -a
- After the third nic shows, copy the configuration of eth1 to eth2 (asuming the new nic is eth2): cp /etc/sysconfig/network-scripts/ifcfg-eth1 /etc/sysconfig/network-scripts/ifcfg-eth2
- Now edit the ip configuration: vi /etc/sysconfig/network-scripts/ifcfg-eth2
- Restart you network configuration: service network restart
- Check if the desired new IP address works: ifconfig
To make sure everything is working ok, check the following:
- Can you still resolve the FQDN names of your important servers like vCenter Server, SSO Server and your database server.
- Can the client devices ping the vCloud Cell?
Change routing
In my configuration I had to change the routing too, because all traffic now had to use the new VLAN, except for the Management traffic. To change the routing I did the following:
- Edit the network file: vi /etc/sysconfig/network
- Change this line to reflect the IP address of your gateway: GATEWAY=xx.xx.xx.xx
- To add static routes first check if there are already static route files: cd /etc/sysconfig/network-scripts/route-*
- If there is a route-eth0 or route-eth1 file, check to see if you need to edit them. If there is no route-eth0 file, create one: touch /etc/sysconfig/network-scripts/route-eth0
- Next edit the file: vi /etc/sysconfig/network-scripts/route-eth0
In my case I added the following lines:
default via 172.17.1.254 dev eth2
zz.zz.zz.0/24 via yy.yy.yy.254 dev eth0
In this zz is the IP address of the network you’re trying to reach over eth0 and yy is the IP address of the gateway on eth0.
- Let’s throw another network restart out, to make sure your config is working: service network restart
- Again check if all servers you need to reach are reachable.
Changing vCloud Cell Settings
When your new IP configuration is working correctly, continue to edit the vCloud settings. The following steps are taken from KB 1028657 but in some points I made small adjustments.
- Stop the vCloud Cell (but we did that already before): service vmware-vcd stop
- Go to your database server and open a query to the database. I’m using MS SQL and get a list of your cells and their IP address: select * from cells;
- Update the cell with the new IP, use the HTTP IP: update cells set primary_ip=’172.17.1.34′ where name=’vcdcell001h’;
- Make sure the change worked: select * from cells;
- Back to the RedHat system running the vCloud Cell, switch to the $VCLOUD_HOME/etc directory: cd $VCLOUD_HOME/etc
- Just to be sure make a copy: cp global.properties global.properties.old
- Edit the global.properties file: vi global.properties
- Change vcloud.cell.ip.primary to the new primary (HTTP) IP address (in my case eth1 address)
- Change consoleproxy.host.https to the new console proxy IP address (in my case eth2 address)
- Change both the IPs in the vcloud.cell.ips field appropriately (in my case ONLY the eth1 and eth2 address)
Well, here we are. You’re done. Let’s start the vCloud Cell and see if it will still run.
- To start run: service vmware-vcd start
- Keep an eye on the cell logging to see if the cell is ready: tail -f /opt/vmware/vcloud-director/logs/cell.log
After the following messages, the Cell seems ready:
- Application Initialization: 94% complete. Subsystem ‘com.vmware.vcloud.jax-rs-servlet’ started
- Application Initialization: 100% complete. Subsystem ‘com.vmware.vcloud.ui-vcloud-webapp’ started
- Application Initialization: Complete. Server is ready in 1:23 (minutes:seconds)
- Successfully initialized ConfigurationService session factory
- Successfully posted pending audit events: com/vmware/vcloud/event/cell/start
- Successfully started scheduler
- Successfully started remote JMX connector on port 8999
Now logon to the webportal from your new VLAN. All working? Don’t forget to remove the snapshot.


call me crazy, wouldn’t it be easier to just deploy a new redhat cell with 3 NICs, install vCD using the response.properties file, add it to the vCD cell cluster, and then delete the old cell?
Oh come on Kendrick, where is the fun in that?
Ok ok, you’re right… but still a few points from this blogpost can help: setting up the routing and remember to disable SSO :-)
Good article @gabvirtualworld. I’d also add make sure the new IP address has permission to the NFS export for transfer server storage
Deploying new (and decommissioning old) assets in a large siloed environment is a huge pain in the paperwork asshole.